Tag You’re It! Challenge: Little Owl Tag
![]()
I am honored to be the Guest Designer at Tag You’re It! this week! A huge thank you to Tracey and the ladies over there!
The inspiration tag for Challenge #28 was created by Jen Mitchell.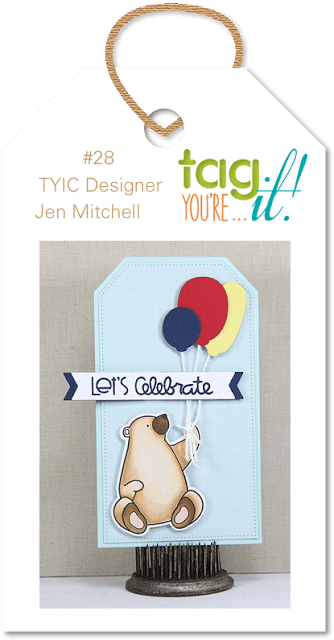 I love how she colored her bear on this tag, the blue background, and the layout’s simplicity – so that is what I drew from as the inspiration for my little owl tag.
To start, I got me some dark blue cardstock and trimmed it with a Fiskars 9″ Bypass Trimmer to form a tag shape.
Then, stick the blue tag onto white cardstock and trim around the edges again; you can leave as much of the white showing as you like. I wanted a border about the same width as the outline around my stamped owls.
Grab a white gel pen (I use a Signo Uniball, link below) and carefully draw a stitched line around the edge of the tag.
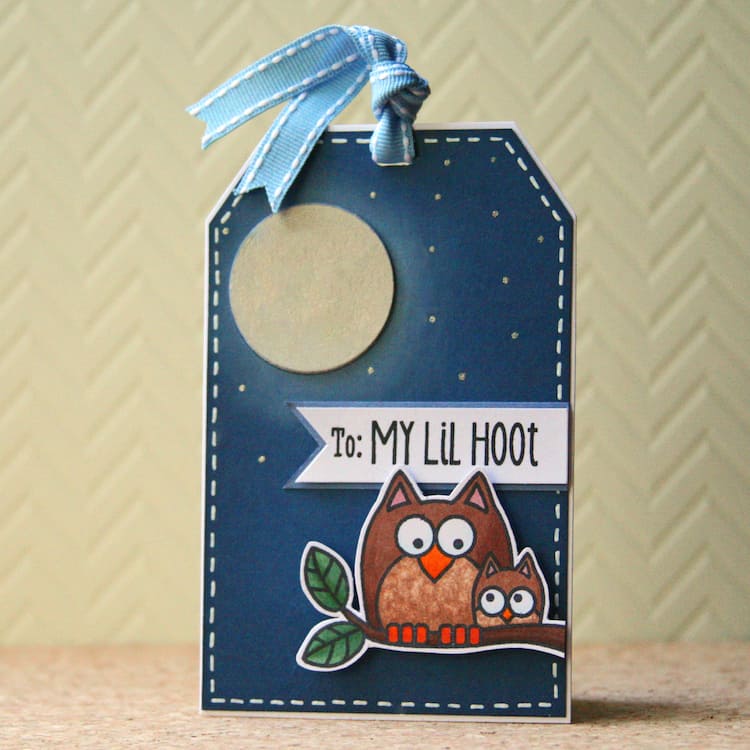
Next up, punch a circle (again, however big you’d like it – mine is 1.25″) from the ivory card, cover it with clear Wink of Stella and set it aside to dry. Meanwhile, stamp your owls on white paper. If you are coloring with pencils or Copics, a smooth card stock will do the trick. If you are using watercolors to color your image, make sure to use watercolor paper to keep from ending up with a lumpy mess.
Ask me how I know. 🙂
After I tried watercolor a few times, I settled on alcohol markers to color my little owl tag.
Once you have your coloring done, cut out your image and adhere it to the tag with a couple of foam squares. Trim the branch if you need to. My tag is 3″x 4.5″, so I did have to trim mine for my owls to sit in the right spot.
Then, find you a sentiment that will fit on a 0.5″ x 2.5″ strip of paper. Stamp, trim and tuck in behind the owls with a little adhesive. A dab of glue works well here.
Grab your moon and lay it where you want it to be, and lightly pencil around the edge. Lift it up again and get a tiny amount of white pigment ink on your fingertip. Dab it off on a piece of scratch paper, then carefully smudge it around the circle you drew, blending from inside the circle and working your way outside the line. This makes the glow you see around the moon.
To finish off, adhere the moon over your pencil outline with thin foam squares. Add a few stars with a GellyRoll pen (I used silver), and you’re done 🙂
Thanks for stopping by to see my little owl tag for the Tag You’re It! Challenge. If you like this post, I’d love for you to pin it on Pinterest!
PS – Here’s another project featuring a cute little bird!

The links below are affiliate links to the products I used today. There’s no additional cost to you, and if you decide to click and shop, I really appreciate the support! Thank you!

Your little owls are incredibly sweet, cuddled together on their branch under the full moon and starry sky. A wonderful scene in every way! Thank you so much for joining us as a GD for this challenge; your tag is a fabulous take on Jen’s and an inspiration all on its own!
~c
Thanks! I had so much fun with this 😀